What happens in Vegas may stay in Vegas, but the same can’t be said for what happens on your computer. The nature of information security is such that it’s usually a question of when, not whether, something sensitive will leak. Even the blueprints to Marine One, the presidential helicopter, are in the wild.
So how do you safely store sensitive files on your hard drive? Enter secure disk images. A disk image is a file that acts like a virtual disk when you open it. You can add files to that drive and they’ll be stored in the disk image file. When you eject the virtual disk, all that’s left is the disk image. If that image is encrypted, it becomes a pretty safe place to store sensitive files.
Here’s how to create a secure place on your Mac to store your tax returns, estate plans, bank statements, and scans of your Social Security card, driver’s license, and passport. (I’ve needed all of these in the last year.)
Create a new image by opening Disk Utility and selecting File > New Image > Blank Image… (⌘N).
This is how you want to configure it:
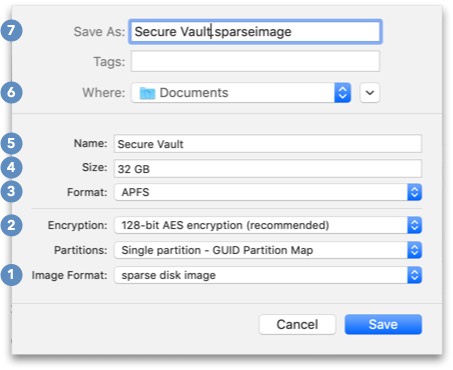
Some of the values you’re going to change towards the bottom will make changes to fields that are higher up, so it’s easier to work from the bottom up.
- Make it a sparse disk image. A sparse disk image only takes up the space it needs (plus a little overhead). You may want to reserve several gigabytes of space (see step 4), but you don’t want all that space taken up on your hard drive until you need it. A sparse disk image will grow with your needs.
- Encrypt it. This is very important! An encrypted image can only be opened if you know the password. Select 128-bit AES encryption and you will be prompted to enter a password. Use 1Password to create a strong, unique password to protect your image. Store the password in 1Password so you don’t have to devote precious brainpower to remembering it. I’ll talk more about whether you should store the password in the keychain later.
- Pick a format. If you’re not going to clone this image to a physical thumb drive, this is optional. The file format you use determines whether you can use the physical USB drive with macOS or Windows. If you are going to use the physical USB drive with both Windows and macOS computers, select ExFAT. If you’re going to only use it with Macs, select APFS. (If you’re not going to create a physical USB drive from this image, then it doesn’t matter.)
- Match the size of your thumb drive. If you’re going to create backups of this image on a physical thumb drive, enter the size of the thumb drive. This way, you can only put as much on the disk image as will fit on the physical drive. Don’t worry—because this is a sparse disk image (step 1), it won’t take up the 32 GB on your hard drive unless you’re storing 32 GB of data on it.
- Name the disk. This is the name of the disk image—what shows up in the Finder when you mount it. If you’re like me, this is the hardest decision to make. It’s also trivial to change later. Just call it “Secure Vault” for now.
- Save the disk image to your Documents folder. Or anywhere, really. This is the least important decision—you can always move it later. Just make sure you can find it again.
- Give the file a name. For convenience, use the same name as the virtual image.
Congratulations! You now have a virtual disk image where you can store your tax returns, estate plan, and plans for world domination. It may take billions of years for a bad actor to break into that disk image, but security is only as good as the humans involved.
While the disk image is open, its contents are accessible like any file on your computer. If you leave the disk image mounted when you’re not using it, you’ve defeated the point of the encryption.
You can store the password for the disk image in your keychain if you want to. That makes it easier for you to get into the image—just double-click the image and it will mount the disk, just like it wasn’t encrypted. The image is still protected from a bad actor who gets access to the encrypted file, but if they sit down at your computer (and can log in), they can just double-click to open it, too. For this reason, I don’t store the password in the keychain: I have to retrieve the password out of 1Password if I want to open my secure vault, which adds additional layers of security.
There’s always a trade-off between security and convenience. The easier it is for you to access something, the easier it is for a bad actor to access it, too. Fortunately, a few simple precautions—such as storing sensitive files on an encrypted disk image, using a strong password you have to look up in 1Password, and putting away your toys when you’re done playing with them—creates a secure workflow with little overhead.
Windows also supports secure disk images. If you need this same workflow on Windows, How-To Geek has a great writeup on creating encrypted virtual hard drives on Windows.
It may be easier to ignore security altogether, but remember the hassle it will be if you get breached. An ounce of prevention is truly worth a pound of cure.
Question: Would you store the password in your keychain? Why or why not? Share your thoughts in the comments, on Twitter, LinkedIn, or Facebook.