I’ve loved tear-off stationery pads as long as I can remember. You know the ones—they’re like Post-It Notes with a form printed on them. Shopping lists, to-do lists, packing lists, babysitter instructions… Once, my parents bought a “While You Were Out” pad to keep by the phone in the kitchen. I was thrilled.
Paper is powerful, and stationery pads give you a starting point to help you quickly create a powerful little document, sometimes as little as 3″×3″. You knew you wouldn’t miss something because you had a template. All you had to do was fill out the fields.
Fast-forward to today. The world is much more digital now but we have a lot of the same workflows—meeting agendas and minutes, quarterly reports, envelopes… Have you ever started a new document by creating a copy of and old document? You know how helpful it is to have a template to start from instead of starting from scratch every time.
Did you know the Mac has a built-in feature that lets you turn any document into a digital stationery pad? It’s a great way to get a jump-start on any workflow.
Some apps have built-in templates. When you go to create a new document, you can choose from a list of canned templates. These are incredibly useful. Can you imagine if you had to start from a default 8.5″×11″ document and resize the page down to 4⅛″×9½″ every time you wanted to print a number 10 envelope?
As you identify your workflow, you can automate a significant portion of the work by creating your own template. If the app supports this directly, like Pages and Word, you can use the built-in support. Whether or not it does, you can always create your own tear-off stationery pad from any document.
- Create a new document. This can be a Pages or Word document, an OmniGraffle diagram, or even just a plain text file from TextEdit. Use whatever you’re currently using.
- Prepare the form. Create the form you want to fill out, what the stationery pad will look like. (Yes, you can start with an existing document and pare it down.) Include major sections and any prompt text your future self would find useful.
- Save the document. Put it someplace organized, where you can find it again.
- Find the file in the Finder. As a shortcut, you can probably just command-click on the name of the file in the window’s title. A pop-up menu will appear showing you where the file is and you can open the enclosing folder from there.
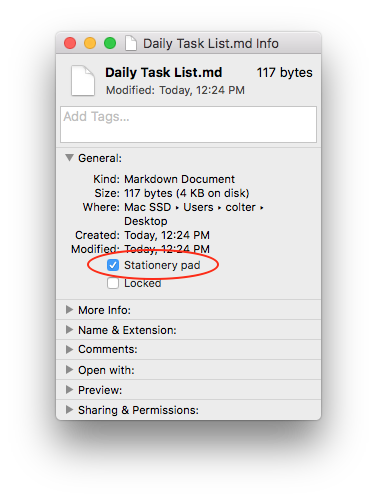
- Get Info. Select the file and press
⌘I. - Check “Stationery pad”. It’s towards the bottom of the section labeled “General:”.
Congratulations! You now have a digital stationery pad. So what’s different?
When you double-click on a stationery pad in the Finder, it doesn’t open the document. Instead, the Finder will create a copy of the document and open that copy. It’s like creating a new blank document, copying everything from a separate template document, and pasting it in, except it took just a double-click.
If you need to make changes, turn “Stationery pad” off. Then you can edit it like a regular document and make your changes. Turn it back into a stationery pad when you’re done.
Creating your own stationery pad is a great way to jump-start any document-creation workflow. It gives you a consistent starting point and eliminates the monotony. Instead of worrying about whether you’re forgetting something, you can dive right in and start getting things done.
Question: What documents do you routinely create that you could turn into a stationery pad? Share your thoughts in the comments, on Twitter, LinkedIn, or Facebook.