I have a love-hate relationship with paper. I finally plan digitally, though some days still need the power and reliability of paper. Most of my reading is done digitally, though physical books do have their appeal. I have switched every statement that I can over to paperless, but there’s always that odd account that sends paper bills in the mail.
Those paper bills are a huge crack in a paperless workflow that important things can fall through. If you’re going paperless, you need a good scanner, and a good way to file things so you can find them again. That’s where Evernote comes in.
Evernote is all about capturing information and making it available when and where you need it. It’s great at storing supporting information for the tasks and projects you’re working on.
Here’s how to use Evernote in a paperless workflow to make sure the bills get paid on time.
Capture the Bill in Evernote
First, you need a digital copy of the bill. If you have a PDF statement, perfect. If you can use Evernote’s web clipper to capture a copy of your statement, that works, too. Go 100% digital if you can. If you still receive a copy of the bill in the mail, you’ll need to start by scanning it.
I do most of my scanning on a desktop document scanner, but as my phone gets smarter, I’m starting to capture more on the go. No matter what kind of scanner you have, the process is basically the same.
By default, my ScanSnap S1500M scans a PDF to the Desktop. From there, I just drag the file to Evernote. You can also configure a scanning profile that adds the scan straight to Evernote. (The ScanSnap Evernote Edition does this for you.) If you have a Doxie, its software will save scans straight to Evernote, too. If you’re on the go, the Evernote app for iOS has an incredible document scanner, too.
If there is particularly sensitive information on the bill (like SSNs or account numbers), you should consider redacting it. You can read more on Evernote’s security and privacy policies on their website. Personally, I trust them with a lot of information. There is some information that I redact, using either Adobe’s Acrobat Pro or SmileOnMyMac’s PDFpenPro.
Tag the Note
Once the bill is ready, add it to Evernote. Since this represents something you need to do, it should go in your Planner notebook. (Once you’ve paid the bill, you can delete the note or archive it as you see fit.)
Now to organize it. This takes just a few seconds and will save you time when you go to pay your bills.
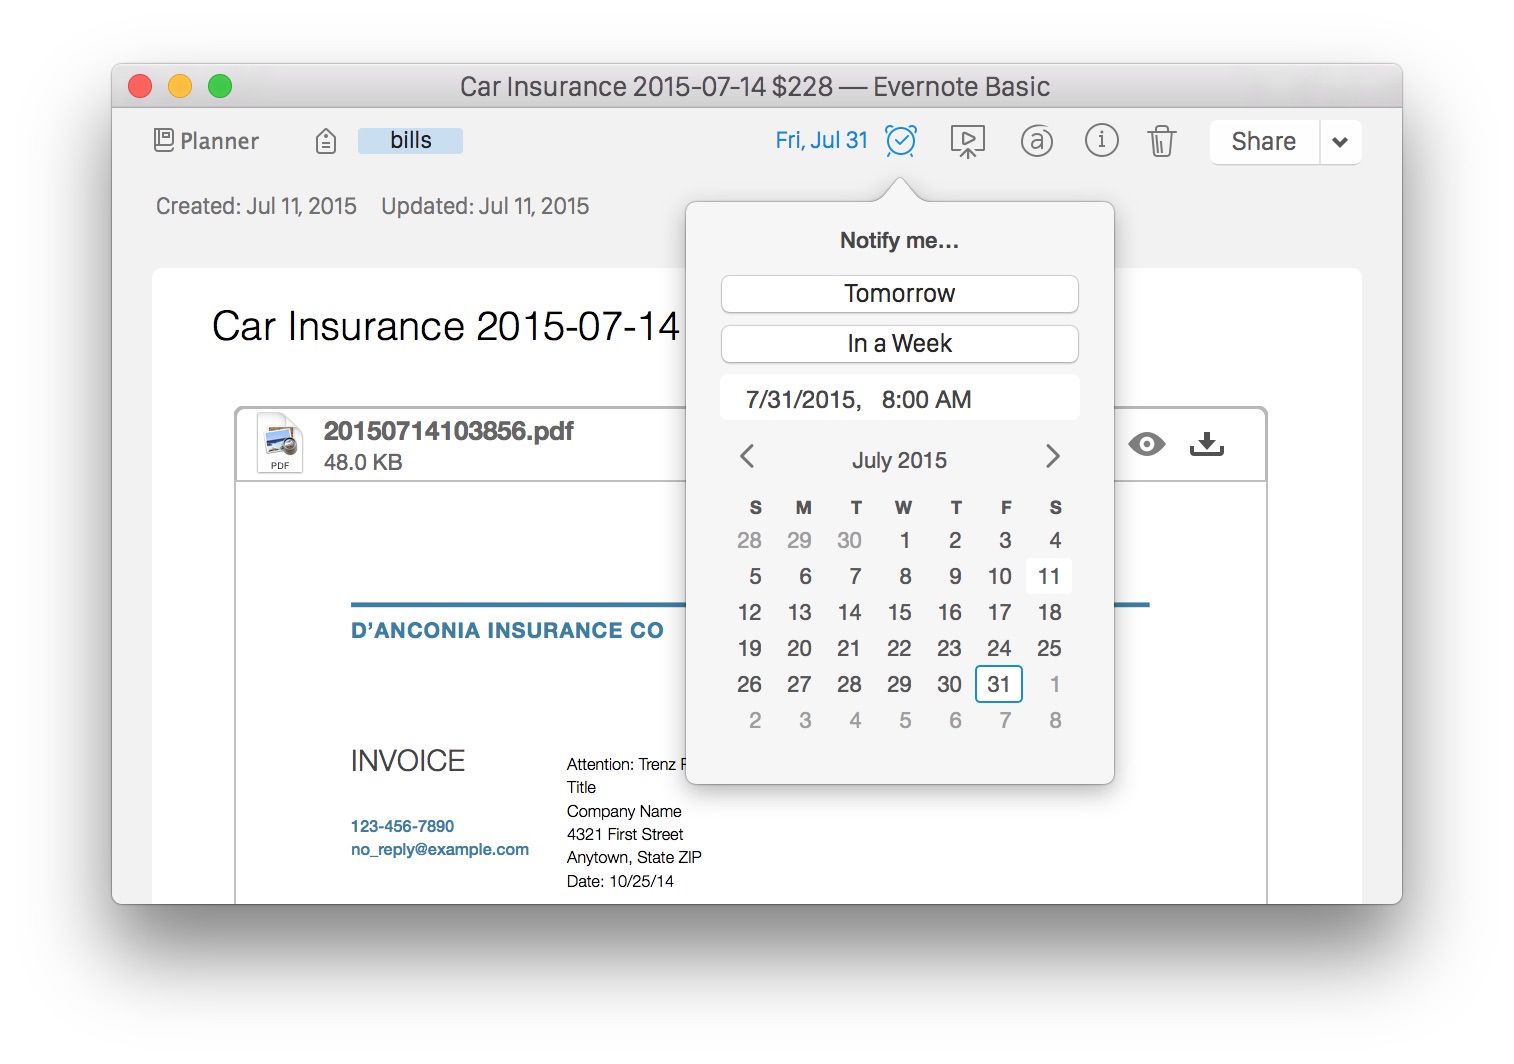
- Change the title. Rename the file to “Payee YYYY-MM-DD”, using the statement date. By writing the date like YYYY-MM-DD, it makes it easy to sort the bills from a particular provider by date in a list. You should know exactly what the bill is when you see the title. For bonus points, put the dollar amount at the end. For example, “Mustang Insurance 2025-09-05 $228”.
- Tag it. Add a bills tag to the note. This will make it easier to find all your unpaid bills later.
- Add a Reminder. Click the alarm clock to add a reminder. Then click Add a Date to set the due date. I’d recommend a few days before the bill is due to give yourself some leeway.
- Create an OmniFocus task for the note. This is optional but recommended. You should have all your tasks in one place, so create an OmniFocus task, too. Copy a classic note link (right-click on the note in the list, hold the option key, Copy Classic Note Link) and paste into the OmniFocus task’s note. Now the bill is integrated with the rest of your tasks, and you can get back to the note quickly. (For more information on linking tasks in OmniFocus to notes in Evernote, see “How to Create Project Support Notes in Evernote”.)
Congratulations! The bill is now filed in your trusted system. When it’s time to pay the bill, you can bring up the original bill in Evernote, where you have all the information you need.
When you view your Planner notebook, you’ll see the bills to pay at the top of the list, with any other incomplete reminders you have. Be sure to turn on Sort Reminders by Date and Show Upcoming Reminders.
When I pay a bill, I’ll not only check off the reminder in Evernote and the task in OmniFocus, but I’ll also annotate the PDF to write “Paid online 9/5 Visa x2345” across the top, just like I used to do with paper bills. I’m trying to remove as much paper as I can from my life, but there are some aspects of a paper-based workflow that I still like.
This has become one of my favorite workflows with Evernote. Bills come in, they’re scanned, and I can shred the paper. When the time comes, I can bring up the original bill, and I know I’m not missing anything. The best part is that it’s integrated into my trusted system, so I know that the bill won’t fall through the cracks—it will get paid. That kind of peace of mind is priceless.
Question: How do you track bills you need to pay in your planning system? Share your thoughts in the comments, on Twitter, LinkedIn, or Facebook.

